How do we frame a shot to make our story more interesting & more compelling.?
How do we draw attention to our subject using composition?
Many of the techniques I am about to discuss you will no doubt already know or at least have an inkling about because they are the same as for Stills photography, the difference for filmmaking is that we have to apply those rules and hold them over a moving image.
Tip No.1 The Law of Thirds
This is one of the first “rules” of composition every new photographer and filmmaker learns.
Disclaimer No.1… although this is called a “law” or “rule” as are many other compositional techniques this is not in the strictest sense true because there are many instances where you may break or bend these rules in the service of either the composition, the subject or the story.
So… it is more of a guideline for compositions that breaks your frame down into thirds creating a grid of nine boxes with four key intersections that form compositional power points.

Placing your subject on any of these lines, boxes or intersections immediately creates a more powerful composition to which a viewer’s eye will be drawn to.
The difficulty with Wildlife filmmaking is that when holding a static frame across which your subject will move you have to plan ahead, firstly in framing your shot and secondly in predicting (or being lucky with.!) the path the animal will take to maintain that position along a “third” line or intersecting point.
Disclaimer No.2: Having said that though, it is not written in stone that this must always be the case and it is worth noting that in wildlife cinematography the subject is what is of main interest so as long as the viewers attention is still drawn to this whether it is strictly on a “third” or not is the be-all & end-all.
If you are following your subject by panning you need to hold its position in the frame either on that “thirds” line or on that intersection ..this becomes even more difficult if the subject is moving towards you and getting bigger filling the frame more and more, or away from you and getting smaller in frame, or if it interacts with another animal on its way and then you have more than one subject to frame nicely.
A useful tool most cameras have that will help you find and maintain position is by turning on the grid lines feature in camera. (See your camera’s user manual as to how to turn this feature on)
Again at this point I want to stress that although this is called the “law (or rule) of thirds”, this does not mean it cannot be bent or broken when the effect of doing so can provide an even stronger frame.
The thing to remember when breaking this rule is that symmetry in your frame will help you break the rule but also you will notice that in most cases the rule is not being entirely broken and that some key part of the subject (usually the eyes) do hold true to the rule… I will explain more below.
The most intentional way one might break this rule is by placing your subject smack bang in the middle of the frame, or if we’re framing a landscape, instead of placing your horizon on a “thirds” line you cut the frame in half and have the horizon run right through the middle.
Remember what I said about symmetry being key to making this work for your subject or landscape… let me explain further with illustration…
This works best when the subject is staring straight down the lens creating a symmetry between the two halves of the frame. Remember also what I said above about the rule not being completely broken.. see the clips below where the subject is in the centre of the frame “breaking” the rule… but it’s eyes are still on the top third box.. and in fact if you notice, the entire subject is in the middle third column, so actually adhering to the rule. So it both is and isn’t breaking the rule but the composition remains strong.. eyes in the thirds, subject entirely in the centre thirds column, and symmetry in the frame.
Note also that in instances where you want to show authority, status, intimidation, pride, awe etc.. placing your subject centre frame with eyes near the top helps to add to that feeling.
For a horizon to cut through the middle this can be used to beautiful effect when:
- Firstly, there is a symmetry in the landscape, for example caused by reflection (see clip below), and/or :
- Secondly, your subject is placed on a or runs across a thirds line or row, or an intersection within that scene.
In the scene below filmed during my Purely Pelicans photography workshop, the water is a perfect reflection of the sky and mountain and in fact it is hard to tell where the water ends and the sky begins.. this is a great example of an instance where placing the horizon in the middle can create a great effect… this composition is made even stronger by the pelicans flying across both through the centre of frame and what would be the “thirds” lines & rows, combining these two framing techniques to create a strong visual.
Tip No.2 Leading Lines
This is again one that is common to both photography and cinematography.
When you venture out into the wilderness look for some of the natural lines that occur in the environment as these can create visual pathways leading your viewer into the story and into the environment. It’s also a great way of introducing your subject to the viewer.
These lines can either draw your viewers attention to the landscape itself or show where your subject may be appearing, coming from or going to.
These can be anything from a stream running through the landscape, a line of trees, a trail or even the lines formed by the edges of boulders as in the example clip below that form a corner which I have placed on an intersection.
The clip begins without a subject in frame but notice how your eye is drawn to the corner of the boulders in shot, then, when the Suslik pops up your eyes are already there expecting it.. the pay off of the squirrel popping up exactly where your eyes drifted to is what makes the image pleasing for the viewer… and the cuteness factor of course.!
Note that in wildlife cinematography when you have leading lines, it is not always necessary to place your subject on the thirds lines or intersections as long as the leading lines are placed on the thirds or intersections and they eventually lead your viewers eye to the subject.
Again, you can see this is not just solely the use of leading lines but it’s combination with the rule of thirds which makes for an even stronger and more pleasing frame.
Tip No.3 Balance Your Frame
“Negative space” can be a useful compositional tool but depending on where your subject is placed this can sometimes lead to an unbalanced image where there is too much loaded on one side or the other creating a visual imbalance.
Framing your shot so that there is a counter-balance to where you have placed your subject will give a more pleasing composition that shows off and draws your viewers attention to the subject but also balances your subject within the frame.
At this point we should also mention “headroom” and “looking room”.
Headroom basically means your subject should have enough breathing space above their head so as not to look cramped in the frame.
Looking room means that you take into account where your subject is looking or in which direction they are moving or about to move. and leave space for them to move in to either literally or figuratively.
For example, if a bird is looking to the right, you should position it on the left of frame with space where it is looking or moving to.
In the example of the European Bee-eater below you can see a combination of all three tips we have discussed so far… the branch forms a leading line the tip of which is positioned exactly at the top left intersection. When the bird flies in and lands on the branch it is positioned on the left “thirds” line with it’s head at the intersection and there is plenty of space to the right of frame where it is looking and eventually flies off to. Balance is provided by the fact that the bird flies into frame from the right where all the negative space is… leading lines, thirds, balance and space with “looking room” all combine to provide a pleasing frame for the viewer.
Tip No.4 Symmetry
As I mentioned before when talking about breaking the law of thirds and also for having a balanced frame, Symmetry is another compositional tool that creates strong impactful frames.
Used in conjunction with other composition and framing rules, utilizing symmetry can take your shots to the next level especially when combining with the rule of thirds, leading lines etc.,
It basically entails cutting your shots in half breaking the rule of thirds and having each half (whether top to bottom or left to right) match or even reflect the other half.
The shot below of the pair of Great Crested Grebes courtship is a perfect illustration of this concept. Each one mirrors the actions of the other as they face each other creating a perfectly symmetrical image when placed in the middle. Additionally note that their bodies are placed on the bottom “thirds” line and intersections.. note also the leading lines formed by their reflections.
Tip No.5 Depth
Once again, as true as it is for photography it is also true for filmmaking.
As I’ve mentioned several times already, bringing attention to your subject is the main purpose of using all of these techniques in wildlife filmmaking and choosing the right depth of field for your given subject and scene is hugely important. Choosing a wide aperture to add separation from your subject to the background is a fantastic technique for achieving this but don’t forget there are also moments when you do want depth in your shot in order to include other elements of the scene or other subjects that are also necessary to your story. Have a look at the clips below and you can see how a shallow depth of field helps separate the subjects from their backgrounds.. but note also how in the last shot of the pelicans, a smaller aperture ensures the landscape and all the pelicans flying in to shot are sharp… in this shot the objective is not to draw attention to any one specific bird but to capture the scene, and the environment in which they live.
In wildlife filming and photography a common problem is overly busy backgrounds. An added benefit of a shallow depth of field in wildlife filmmaking is that throwing the background out of focus can also help remove many distractions which take attention away from your subjects.
Choosing your spot from which to film is really important here too. Moving your position slightly whether to the left or right, higher or lower can massively impact your frame by eliminating distractions behind your subject from your composition.
Tip No.6 Frame within a Frame
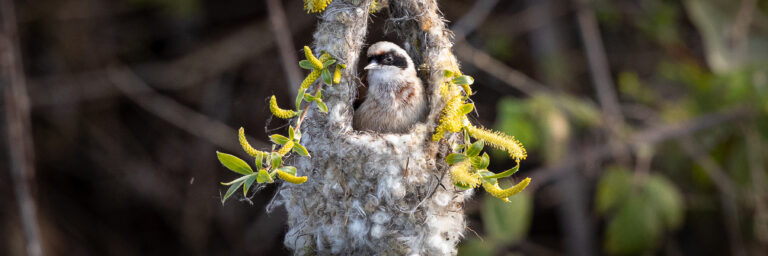
This can be a tough one to achieve when filming Wildlife because there are not too many naturally occurring frames within which to compose your subject in nature… they are there however even though they may not be so obvious.
So what we’re really talking about is choosing holes or gaps, whether it be in trees or grasses or, for example, dens, burrows, nest holes in trees etc.. within which you can frame your subject. Again, when used in combination with other principles of composition.. rule of thirds, symmetry etc… this can give additional impact to your compositions.
For urban wildlife this becomes somewhat easier as you can utilise barn windows, rock walls and fences that owls and other birds, foxes, martens or any other critter might use either as a perch. a vantage point, or a peep hole.
Conclusion
The overall aim of using these compositional tools is to emphasize your subject within the frame so as showcase their beauty in the whole and in the detail, to illustrate their behaviours, movements and habits and to better tell their story.
Using all of these compositional techniques either on their own or in combination will help you create powerful visuals with which to accomplish just that.
Thanks for taking the time to read this article and I hope it proves of help to you.
all the best
George